You can find me at my new typepad blog now! Still the same fun, art and color! See you there.
Lee
Friday, January 21, 2011
Thursday, January 20, 2011
Another Valentine's Card!
I do love Valentine's Day and all the fun cards one can make for nearly anyone! Who doesn't like getting a Valentine's Day Card?
This card happened by chance, yes it's a card, not a tag! I had colored in the background and looked at it for days wondering what to do with it. While surfing the web I saw a card using a flourish with a bird on it. The light went on and I borrowed the concept to create this card.

What you need:
Dream Weaver Stencils: LS94- Bird on Branch and LX7001 Damask background
Colorbox Chalk Inks
May Arts ribbon
I stenciled the damask background on white paper using Colorbox Gray Whale Chalk ink. Then I added the bird using Colorbox Berrylicious Chalk ink.
Layer the paper on red card stock. Wrap a length of ribbon along the front. Tie a bow and adhere to ribbon.
It is easy to tie a bow separately and attach it than trying to tie it with a length of ribbon around the paper.
Take a section of ribbon and your scissors. Tie the ribbon around the closed blades of the scissors, pulling the knot and bows tight. With another pair of scissors, trim the ends so they are not too long. Slide it off the scissors and adhere to the ribbon/card.
Thursday, January 13, 2011
It's Thursday Again!
Welcome to Thursday Dream Schemes featuring a great idea using Dream Weaver Stencils. Be sure to visit the other bloggers on the Dream Team and see what fun things they have come up with.
It may not be obvious but I am sort of an earthy type. Growing up in Portland, Oregon where it rains a lot, I spent a good portion of my childhood playing outdoors in the mud (much to my mother's dismay). I grew up to have several outdoor jobs that frequently left me muddy! Now, I only get to play in the dirt on my days off when I work in the yard. That's ok. Though Harvey, our pup, manages to bring in enough dirt for all when it is wet enough.
Today's challenge has us using this template:

Here is what I created:


It may not be obvious but I am sort of an earthy type. Growing up in Portland, Oregon where it rains a lot, I spent a good portion of my childhood playing outdoors in the mud (much to my mother's dismay). I grew up to have several outdoor jobs that frequently left me muddy! Now, I only get to play in the dirt on my days off when I work in the yard. That's ok. Though Harvey, our pup, manages to bring in enough dirt for all when it is wet enough.
Today's challenge has us using this template:
Here is what I created:

I love tags, you will see more over the next several weeks.
For this stencil I used the following items:
Dream Weaver stencils LS94, bird on a branch, Bird cage LL3012 and Swirls LJ890
Ranger Distress Inks to ink the stencils and to distress the tag, paper and oval
Old dictionary pages
Grunge Board for the oval
Tim Holtz adornments
Ribbon colored with Distress Ink
Tag from American Tag
Tear a portion of the dictionary page so that the rough tears are facing you. Color with blue Distress Ink using the foam ink applicator. Set aside.
Age the tag with Vintage Photo Distress Ink and the foam ink applicator. Using the swirl stencil, lightly stencil in the background using a stencil brush and the Vintage Photo ink.
Stencil in the Bird Cage using Distress Inks, add the bird from the bird and branch stencil.
Adhere the dictionary page to the bottom of the tag, trim any overhang on the tag.

Take the oval grunge board, adhere dictionary page. Trim the dictionary to the edges of the oval. Age with Vintage Photo Distress and Aged Mahogany inks. Stencil on the Bird on Branch using Ranger Distress Inks.
Adhere the oval to the tag.
Print out or stamp sentiment for the card.
Add the ribbon and charm to the top of the tag.
That's it today! Have fun and be creative -- it's really good for your brain!
Thursday, January 6, 2011
First Thursday Dream
Happy New Year Everyone!
 Today's Dream Weaver stencil design uses a tag, old dictionary page, Color Box Chalk Inks and Ranger Distress Inks and Ranger Stickles. I used stencil LJ888 to create the tag.
Tear the old page in a random manner. Adhere to the tag. Using Ranger's foam ink applicator, rub on a dark brown color to age the tag and paper.
Tape the tag and stencil down, using your stencil brushes add colors for the flower. I used three shades of pink and purple. For the leaves I used two shades of green.
Add the Stickles on the leaves for a little glitter on the tag.
I love this stencil because it is so easy to use multiple colors and create depth. To me, that is one of the great advantages of stencils, the ability to use many colors and blend them to create looks and layers. In rubber stamping this is a bit more difficult. Check back next Thursday for more ideas on using stencils to create depth.
Lee
Thursday, December 30, 2010
Background on metal heart

I used a metal refining tool, it looks sort of like a dental pick, to draw the curlycues on the metal to hide any flaws that happen. It is a great technique to finish off metal.
Lee
A Little Valentine's to Warm the Heart

For this card I used Dream Weaver Stencils Love Birds LL3011 and Be My Valentine, LM276. Merc Art Pewter and May Arts ribbon were also used. Card stock and hearts are from my stash, so I have no idea where they came from. That's the hazards of being crafty and a collector, you suddenly find things in your boxes a couple of years later with no idea of where it came from!
I embossed the pewter with the Love Birds stencil, using the Sizzix Vagabond die cut machine mounted it on red paper, rounding the corners on both to create an even look. Layered on purple paper with the white doily heart below the red layer.
Be My Valentine is brushed on velum with chalk ink, randomly cut out and layered with the heart and bow.
A trick for the little bow: use a pair of scissors to tie the bow. Huh? you ask. Wrap the ribbon around the tip of your closed scissors and proceed to tie the bow as you normally would. Tighten it when completed and slide off the scissors. Done!
While winter has just started I am back to flowers, so watch for some new ideas there. Chinese New Year is coming and it is the year of the Rabbit. Which has led me to some fun thoughts for cards.
Happy New Year everyone! Mind the snow and ice or just mud where ever you live, be happy, healthy and most of all: have fun!
Lee
Thursday, December 23, 2010
It's almost Christmas
And I am on to Valentine's Day!
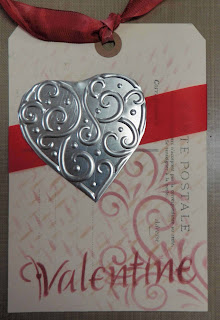 For this fun tag, I used a variety of Dream Weaver Stencils, Ranger Distress Ink, Merc Art Pewter and assorted red ribbons. The tag is from American Tag and is a pre-printed postcard tag. These are the most fun! All of these items are available at Guadalupe's Fun Rubber Stamps and we ship.
First I ran the heart stencil through my new Vagabond die cut machine with Dream Weaver Stencil LL567. Be sure to use a cushion in your sandwich to keep the metal from being squished into bits. I used an older rubber cushion I had from a different die cut machine. Trim the heart and apply adhesive to the back. I used a sheet of red tape or Wonder tape by Ranger so I could trim it to size and get good coverage.
On the tag use Dream Weaver Stencil LJ905, rain drops. Brush in one color then rotate the stencil about 45 degrees and brush on a second color. Use flourish LJ896 in the corner of the tag. For Valentine, I used stencil LM276, taping over the words I did not want to use.
Wrap a red ribbon around the tag, add the heart and ribbon at the top. There you are! The first Valentine's of the season!
Wednesday, December 22, 2010
Digging Out
I have had several people comment that it shouldn't take 6 hours to dig out a driveway. So here are the photos I took while we worked. Our driveway is over 167 feet long on a slight slope and with a curve! It is gravel, so that helps a bit. I know that in many parts of the country, this is nothing. For us, in the southwest, it's a lot at once! Usually we get a couple of inches here and there during the winter.


This is just up from the house.

Harvey about three quarters of the way the drive.

Our car so we know how much to dig out!

Nearing the end!

Mid way with the car for perspective. The house is in the back ground to the left of the car.
Friday, December 17, 2010
Snow Day!
My wish for another day off came true -- to the tune of 18+ inches of snow! Of course we have to shovel the driveway to get the car up it and then wait for someone with lower clearance to drive down the road first. No snow plows on our road.

 Two days ago the weather forecast was for one inch of snow. Yesterday the forecast kept changing. Today it is lightly snowing still. Time to get the cross country skis out and go play. Harvey is loving the snow. He runs and bounds through the drifts, still wanting the ball to be tossed for him to find.
In a couple of days our wonderful winter wonderland will be a mud bog, but that is what old towels and tile floors are for.
Have fun and be creative today!
Lee

This photo is from early yesterday morning, not much snow at all.

In a couple of days our wonderful winter wonderland will be a mud bog, but that is what old towels and tile floors are for.
Have fun and be creative today!
Lee
Thursday, December 16, 2010
A Blue Thursday!
The Dream Weaver Stencil challenge for today is blue and/or purple. I went with blue! It's been so sunny for weeks on end here that it seemed appropriate. And what did I wake up to this morning? Snow! It's been snowing all morning, which I love. The snow always makes it easier to get the Christmas cards done.
Back to my sample: I used the Dream Weaver Blue and Black Glossy Pastes, dragonfly stencil LJ56 and flourish stencil LJ896. The dragonfly is stenciled with the black paste on an acetate tag (Hero Arts) and the flourish is on white card stock. While the paste was wet I sprinkled a random selection of the MetalFX powder on the dragonfly to create the speckled look.
Assembling: Trim the white card stock with the flourish to fit the clear tag. Punch a hole in the card stock. Using various ribbons, mostly from May Arts I attached the two layers together. I added adhesive rhinestones to the acetate tag. That's it!
Have fun.
 Lee
Lee
Back to my sample: I used the Dream Weaver Blue and Black Glossy Pastes, dragonfly stencil LJ56 and flourish stencil LJ896. The dragonfly is stenciled with the black paste on an acetate tag (Hero Arts) and the flourish is on white card stock. While the paste was wet I sprinkled a random selection of the MetalFX powder on the dragonfly to create the speckled look.
Assembling: Trim the white card stock with the flourish to fit the clear tag. Punch a hole in the card stock. Using various ribbons, mostly from May Arts I attached the two layers together. I added adhesive rhinestones to the acetate tag. That's it!
Have fun.

Thursday, December 9, 2010
Two Weeks Before Christmas
T'was two weeks before Christmas at this little rubber stamp store. The stampers were flocking in for their materials to make cards all wanting to know just what Tim Holtz is talking about on his Twelve Tags of Christmas and how do you use his new die cut machine?
"Let me show you" I say, pulling out ink pads and stamps. Now where is the paper?
"But how did you do the metal?" the frantic card makers ask.
I pull out the new Vagabond by Sizzix and show them how to use pewter with their Dream Weaver Stencils. Their eyes fill with wonder at the glory of it all.
 By the time 5 o'clock rolls around the last crafter staggers out the door and I sit for the first time that day.
Yikes! I realize I haven't done my Dream Weaver Stencil card this week. Panic strikes, but our fearless leader Lynell has thought ahead of me and posted an excellent choice on her blog this week.
Thank you all, thank you so much!
Lee
"Let me show you" I say, pulling out ink pads and stamps. Now where is the paper?
"But how did you do the metal?" the frantic card makers ask.
I pull out the new Vagabond by Sizzix and show them how to use pewter with their Dream Weaver Stencils. Their eyes fill with wonder at the glory of it all.

Yikes! I realize I haven't done my Dream Weaver Stencil card this week. Panic strikes, but our fearless leader Lynell has thought ahead of me and posted an excellent choice on her blog this week.
Thank you all, thank you so much!
Lee
Thursday, December 2, 2010
Embossing on Vellum
I use a heavy vellum that still has some translucency. Using embossing paste, I hang dry the vellum, using the tape I had taped it to the work surface. I have had some vellum crinkle, perhaps this one didn't as it was an all over embossing.
I have had success heat embossing vellum using the Ranger heat tool. The Ranger heat tool is a slower heat tool as compared to the Milwaukee heat which is a quick to heat tool. Working slowly with the heat tool several inches above the surface and slowly melt the embossing powder.
I used LJ896 Flourish and LJ819 Snowflakes for the card.
Math Story Problems
That's how I feel with this week's challenge. I just couldn't get it, rather like those dreadful story problems in math class that never made any sense to me, even as a college graduate! Like those problems there are variables, I forgot to note the stencil numbers, they will be forth coming!
Todays card is a layered blue themed snow flake. I used Dream Weaver blue embossing paste -- which by the way is really fun and a wonderful shade of blue. Use the snowflake stencil on velum, lay down the blue paste. Allow to dry part way and dust with the MetalFX gold pigment powder. It will stick to the damp paste. The gold doesn't show well on the digital image, but it is there and is very cool looking.
While the velum is drying, cut your window, I used a 3/4 inch border around the card. Make sure the window is not larger than your vellum, you will need at least a 1/4 over lap so you have a margin to tape down.
On the next layer I used the flourish stencil. Using embossing ink, I stenciled the pattern on the dark blue paper and sprinkled white embossing powder. Melt the powder.
Adhere the dried velum piece to the back of the window you cut out. I use double sided tape. Then tape the window piece to the solid piece that has the flourish on it.
There you are! You could always make one of the top pieces longer with a score on a short side for an inside area for your sentiments.

Thursday, November 25, 2010
Thursday Dream Schemes - Christmas without red or green!
Happy Thanksgiving!
I trust you all will have a good meal with loved ones. Here is today's card using Dream Weaver Stencils. Christmas card any other colors except reds and greens. I chose a black and white theme set against purples. Using the branch and berries stencil (LJ900) I did the branches with Dream Weaver's Glossy Black embossing paste. Once the branches were dry, I replaced the stencil and used Dream Weaver's Metallic Silver embossing paste for the berries. Before the berries dried I sprinkled silver glitter on them.
The Merry Christmas is stencil LS92 and is on black paper with silver embossing powder. It has been adhered with dimensional foam. The snowflake is from May Arts Ribbon.
There you have it -- a fresh look for the holidays!

Wednesday, November 24, 2010
Thursday Dream Schemes coming soon!
Hi Everyone!
Watch this blog for our weekly Thursday Dream Weaver Stencil posting. Those of us on the Dream Weaver Design Team will all be posting our weekly creations using Dream Weaver Stencils. Now that we are in the Christmas/Holiday mode I am sure that you will see some great ideas tomorrow!
Check back regularly to see what new ideas we have come up with!
Here's a few holiday card ideas:

For this card I used the Snow Flake Dream Weaver Stencil (LJ819), Brilliance Inks on card stock and on vellum. Stencil Copper on the outside of the card. On the vellum use gold on the top side, allow to dry then copper on the backside. Once the ink is dry on the vellum position and adhere to the card.

This is a fabulous card to do. The tree in the foreground is stamped in black on vellum. Allow to dry! On the back of the vellum stamp a different tree. Allow to dry! On the inside of the card stamp in silver or emboss yet another tree. The moon is punched and a bit of yellow/orange is stippled on to give a bit of color. Tape the vellum on the inside of the card window. Rubber stamps unknown.

A fun and simple Christmas tag. I used Ranger Distress inks (Old Paper and Weathered Wood) to stamp the large snow flake and the music background. The gold snow flakes are Brilliance Gold, Merry Christmas is Lighting Black. Brilliance is made by Tsukineko. Rubber stamps are by Stampers Anonymous/Tim Holtz.
Thursday, November 18, 2010
What a Busy Month!
Hello
It has been awhile since I have posted. I have been to the Norther New Mexico Quilt Fiesta here in Santa Fe, NM. What wonderful quilts that show off the excellent workmanship. Then I went to the San Diego Polymer Clay Guild's annual retreat for some play time.
Last week I took a great class from Kathi Anderson. We the Black eyed Susan Dream Weaver stencil LJ902 (available from Guadalupe's Fun Rubber Stamps) with pewter to make a little purse. The quick method: cut out your metal first, lay it out on the stencil, run the metal/stencil combo trough the die cut machine - use a pad in the sandwich - you aren't cutting the metal, just embossing it. It will take a couple of passes to get all the metal pieces embossed with the design you want. You may use a small piece of removable tape to hold the metal in place, not too much! The tape can emboss the pewter.


 Work the metal on both sides to refine the image: pushing out (poofing as I like to call it) the metal from the back, outlining on the front. Add squiggles and lines to round out the design and cover up other scratches on the metal. Lay the pieces on double sided adhesive and then on to the purse. Hook and loop stickers make a great closure. Punch holes and add eyelets, run your strap and add beads! There you are, a quick little evening bag.
It has been awhile since I have posted. I have been to the Norther New Mexico Quilt Fiesta here in Santa Fe, NM. What wonderful quilts that show off the excellent workmanship. Then I went to the San Diego Polymer Clay Guild's annual retreat for some play time.
Last week I took a great class from Kathi Anderson. We the Black eyed Susan Dream Weaver stencil LJ902 (available from Guadalupe's Fun Rubber Stamps) with pewter to make a little purse. The quick method: cut out your metal first, lay it out on the stencil, run the metal/stencil combo trough the die cut machine - use a pad in the sandwich - you aren't cutting the metal, just embossing it. It will take a couple of passes to get all the metal pieces embossed with the design you want. You may use a small piece of removable tape to hold the metal in place, not too much! The tape can emboss the pewter.


Monday, October 4, 2010
The Winner the Dream Weaver Blog Hop for this page is...
SherylH!
Sheryl, contact Lynell at DreamWeaver for your prize. I have posted Lynell's comments below:
Sheryl, contact Lynell at DreamWeaver for your prize. I have posted Lynell's comments below:
Hi everyone! A special thanks to those of you who visited our blog hop and especially to the Dream Team designers who spent many hours making these lovely creations. Each one was sooo unique!!! Today I am off to Buena Park to try to convince the retailers in So Cal that they can't live without our stencils in their stores, so I will be back in the evening to discover who has won and work out the details of getting the product to you. My email is on my web-site, www.dreamweaverstencils.com ...so to those of you who have won please feel free to email any questions you may have about your winnings, where you would like your goodies shipped etc. Each design team member will post the winner on their site by midnight on October 4 (some have already posted, but others may be traveling etc.) and I will have some winners to post as well when I arrive back in the office. Then you will have another 24 hours to contact me with your mailing information, so we can get your Blog candy mailed to you.
Lynell
Thank you for all the great comments. Like Lynell, I am off to southern California, only to play with polymer clay at the San Diego Polymer Clay Guild's annual retreat. Photos in a week or so.
Lee
Saturday, October 2, 2010
Dream Weaver Blog Hop
Welcome to my portion of this fun Dream Weaver Stencil blog hop.
I am balloon happy right now. October is balloon fiesta in Albuquerque, which is an hour south of Santa Fe. Hundreds of balloons in the air on a warm fall day is one of the most colorful things I have ever seen!
Here I have created two different examples using the balloon stencil (LL3003).
 This first card I created using a balloon stamp as the background. Stamp A Mania makes the balloon stamp (SF6605K). The card has been painted with Twinkling H20 watercolors. I stenciled the balloon with Vivid inks and stencil brushes -- remember to have a brush for each color group to keep them clean. Cut out the balloon and use dimensional adhesive to place it on the card.
 The second balloon creation is a page for an altered book. Using a map from England, I wrapped the page with part of the map to create the background on the page. Trim the corners as you fold them to remove the excess paper. This will allow the paper to lay smoothly on the back and along the edges.
The balloon was stenciled on white card stock with Ranger Distress Inks and cut out. I then cut a piece of black paper to create shadow and set the balloon from the busy map background.
 Next, I played with two stencils on one of my favorite mediums: tags! For these I used thistle (LL3001) and fern (LM2006) with Ranger Distress Inks and stencils brushes. The tag on the left, I stenciled the ferns in first, using varying shades of green to create a bit of depth to the image. Then I added the thistles in the back. The right tag is three thistles, layered as I stenciled, no masking. The beauty of stencils is that you can see where you have already put ink. This allows you to work around that part, keeping it in the foreground. To finish I added a bit of ribbon by May Arts..
Now on to the next blog: Liz Martin at Black Cat Studios. Have fun and go crazy with all the great ideas we are giving you. Do forget to leave a comment for a chance at a free Dream Weaver Stencil!
I am balloon happy right now. October is balloon fiesta in Albuquerque, which is an hour south of Santa Fe. Hundreds of balloons in the air on a warm fall day is one of the most colorful things I have ever seen!
Here I have created two different examples using the balloon stencil (LL3003).


The balloon was stenciled on white card stock with Ranger Distress Inks and cut out. I then cut a piece of black paper to create shadow and set the balloon from the busy map background.

Now on to the next blog: Liz Martin at Black Cat Studios. Have fun and go crazy with all the great ideas we are giving you. Do forget to leave a comment for a chance at a free Dream Weaver Stencil!
Thursday, September 23, 2010
Dream Weaver Blog Hop
Starting September 30 we will post some great paper crafting ideas using Dream Weaver Stencils. Not only will you see some excellent work showcasing stencils, you can have the chance to win a Dream Weaver Stencil of your choice.
Visit Lynell's blog at http://www.dreamweaverstencils.blogspot.com/ on September 30 to start the hop and check back here on October 2 to see what fun things I have come up with!
Meantime the photo is a page of an altered book that I did for our last altered book round robin. Just one easy and simple idea to incorporate stencils in your paper crafting.

Harvey

I would like to introduce Harvey! You will find him at the store with me on most days that I am there. Harvey is a Golden Retriever and is 7 months old. It is fun to see the world through his young eyes. Motorcycles were new along with small humans. I think he has both figured out! Retrieving is his favorite activity.
Sunday, August 29, 2010
Dream Weaver Design Team Challenge Christmas


I know it seems like August is much too early to think about your holiday card making, but it really isn't. Start planning now. If you have to make a bunch of cards and are overwhelmed at the thought of even starting, do it in bits. Create a simple design, then make the cards in stages. Enjoy my samples, all made with Dream Weaver Stencils.
Friday, July 30, 2010
Zentangles 3
 Hi Bloggers!
I just received a copy of Suzanne McNeill's new book "Zentangle 3". She features several rubber stamp companies, including StampaFe! The book showcases using rubber stamps to create Zentangles. A fun way to get into Zentangles if you are overwhelmed by a blank page. Have Fun!
Sunday, July 11, 2010
Tim Holtz Tissue Tapes

What fun! Theses tapes are translucent and stick well on paper. There are four different themes of tape images, two rolls in each package, providing a good variety of imagery to work with.
I like to stamp a background first, then apply random tape on the tag. On both tags I rubbed the ink pad over the entire tag, then removed the ink from the tape with a damp paper towel. The tag on the right has more stamping over it after the ink coverage. I used Ranger Distress Inks for all of the stamping.
Uses are limited only by your own boundaries -- so get rid of them and have fun!
Friday, July 2, 2010
Happy 4th of July
I hope everyone has a great holiday weekend!
This weekend brings fond memories of family trips to visit relatives. While I am not traveling this weekend I often think of travel journaling since many of my customers are traveling when they come in to the store.
We all seem to have a common thread: we to make a travel journal. However, frustration frequently set in when feelings of ineptness set in because our journal do not look like the ones in the many books that are out on the market. I encourage you to over come these feels and to not compare yourself to others. It’s your journal, your art work and most of all: your creation. Be happy about being able to create.
Here are my suggestions for creating a travel journal:
Have your book before you leave home.
Paint a few pages, put a border on them or some color. The goal is to have some color on the page so it is not a naked page staring you in the face when you open the book.
Keep your travel journal kit simple. I carry my on the airplane and frequently use that time to write, paint and draw. Plus, if I have a delay, I have something to do! I carry a small watercolor set, a set of waterproof pens and a water brush that is easy to fill anywhere and fits in the liquids bag at security.
If drawing seems out of reach, try switching hands. I am right handed most of the time, yet I learned in a drawing class that my left hand has a whole lot more fun than the right. Yes, the images look cartoonish, but I don’t practice all the time at it and am happy to put something to the page. Plus it is good for the brain to exercise it by doing something differently.
Try to make time when you are on vacation to record your thoughts and add to your journal. This I find is the hardest part of traveling. I try to do some in the morning over coffee and the newspaper.
Traveling to National Parks? Each park has a unique stamp at a station inside the visitor’s center that you can use to record your visit to the park. They have a passport book that you can buy and then stamp each park in the book. I have never wanted what was in the book the park system produces but wanted to record my visit. I now carry blank ATC sized cards, stamp the park stamp on one then add a small sketch, ticket, or what ever suits the moment. The card then goes in my travel journal. A quick, versatile way to keep track of the National Park visits.
Have fun with your travel journal.
Monday, June 28, 2010
New to the blogosphere!


Hi Everyone!
At long last I have jumped in and started this blog. I will endeavor to keep up with things happening in the stamping world. I am on the Dream Weaver Dream Team and will share with you the creations that I come up with along with instructions.
I have added two tags the one with the blue ribbon, the back ground was ink picked up from a craft sheet. The images were then stenciled on with Ranger Distress Ink. The orange ribbon tag, I added the ink background with an ink applicator. Then the images were stenciled on with Dream Weaver Stencils.
As you may know we are tag happy at Guadalupe's. I carry small tags around with me that are stamped and decorated. They are the best thank you notes that I leave with exceptional wait staff in restaurants, customer service locations, with someone who has gone above and beyond expectations. In short, these little tags bring happiness and allow me to say more than "thank you."
Subscribe to:
Posts (Atom)